
When I picked up a copy of Heather Ross's book Weekend Sewing, I was thrilled to see all the fresh and simple projects. She has them neatly categorized into projects for around the house, for travel, for dressing women and for dressing kids. Patterns are included with the book, and they're meant to be easy projects that will teach beginning sewers new skills. (Maybe when/if it stops snowing in Colorado, I can get a better picture of this skirt!)
I've got several of her projects on my to-do list, but I started off with the Yard-Sale Wrap Skirt in a simple calico cotton. I thought it would make a good beginning project for my sewing students because fitting is minimal, it teaches some nice finishing techniques, and sewing it is quick and fun. Heather's instructions are simple, but brief, so I'd like to detail here the directions I will use to teach my students. Another note, a few mistakes have been noted in this first edition of Weekend Sewing, including the sizing of this skirt. For a complete list of corrections, click here.


I'm using 5/8" seam allowances with this pattern.
First is fitting the pattern to the person. Because this is a pretty full skirt, you usually won't have to worry about the hip measurement, but you do need an accurate waist measurement. In the list of corrections to the book that are posted on Heather's website, she suggests adding skirt panels if you have a larger waist than the pattern allows for. Instead, I'd like to adjust the pattern piece to fit and just use the six skirt panels she calls for in the original directions. This method will use less fabric yardage. To determine how much to adjust the skirt panel, divide your waist measurement by four (because four panels should make it all the way around your waist, with the last two panels used as overlap), add 1.25" to that measurement to account for seam allowances, then compare that measurement to the measurement of the top edge of the skirt panel pattern piece. The difference between the two, we'll call Measurement A. If you need the pattern piece to be larger, cut the pattern piece in half lengthwise and spread the two pieces by the same amount as measurement A. Fill in the gap with tissue paper and tape. If you need the pattern piece smaller, cut and overlap the pattern piece by the amount of measurement A. Then lengthen or shorten each waistband piece by Measurement A. Hold the pattern piece up to your waist to judge the length, then shorten or lengthen according to your preference.
Next is laying out and cutting the pattern. Here's a rough sketch of my cutting layout. I'm using 44" fabric that is NOT a one-way design, which would require more fabric. This took 3.25 yards. If you want to lengthen the skirt, add three times the amount you're lengthening by to the yardage.
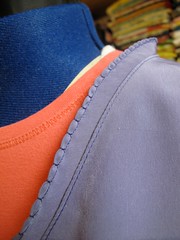
Let the fun begin! It's time to start sewing. Stitch the skirt panel side seams together with french seams using the instructions in the book, as well as finishing the final side edges with a narrow hem.
Also, join the waistband and ties together, turn the bottom of the waistband 3/8" to the wrong side and press, and sew the waistband and facing together, all as is instructed in steps 4 and 5 of the book. If you get confused as to which piece is the front of the waistband and which is the waistband facing (the part that will sit next to your skin) hold the piece up to your waist, right side away from you, bottom edge down. If the longer tie is to your left, you're holding up the waistband. The other piece will be the facing.

When I stitched the waistband to its facing, I stitched not only to the end of each tie as she suggests in the book, but I also stitched around the end of the tie and about 6" back the other way, flattening the pressed over edge as I went. I thought it was then easier to turn the end and get a nice point.

Next, stitch the bottom edge of the waistband facing to the waist edge of the skirt, wrong sides of each piece facing up.

Turn, press, pin the bottom folded edge of the waistband in place (the edge will sit about 1/8" below the waist seam to hide it), and edge stitch all around the waistband edges. Experiment with your presser feet to find one that will give you a nice even edge stitch. I use my blind hem foot.
Now all that's left is to finish the hem with a rolled edge! If you have a rolled edge presser foot, or want to try one, Threads magazine website has a great 3-part post on using this special foot here.
If you want to hand stitch a rolled hem, here's my favorite way to get a smooth, easy finish. I'll demonstrate the technique using contrasting thread on a scrap of fabric, but you'd of course use matching thread.
First, trim the bottom edge if needed so you have a nice, even line. Then choose a presser foot that will help you make a consistent stitch 1/8" away from the edge.
Press the fabric to the wrong side, so that the line of stitching is just showing on the wrong side. Putting in that line of stitching really helps keep the folded amount of fabric even, which is important. A rolled hem can easily look wonky if the folded amounts aren't consistent.
Bring your threaded needle up through the fold of the fabric.
Then pick up just one or two threads of the fabric about 1/8" beyond the raw edge of the hem, right below where your thread is coming through the fold.
Go back to the fabric fold and stitch through just the fold of the fabric about 1/8".
Continue stitching back and forth from the fabric fold to picking up fabric threads a few times.
Then start to tighten the thread so the hem rolls up and hides the raw edge, keeping just the last few stitches loose so it's easier to see where to stitch next. Keep going!
Please let me know if you found this tutorial helpful!


5 comments:
Thanks for the useful tips for the Yard Sale Skirt. It's the next project on my long list of things to sew and I definitely will use the tip of how to make each panel wider instead of cutting a 7th panel. Too bad I only have 2 yards of the fabric I wanted to use. I guess I'll have to go fabric shopping. Bummer. :)
Yes! A helpful tutorial. Thanks.
Great tips! I'm about to tackle this beast myself, but all the negative comments have freaked me out. So I'm scouring the internet for all the tips I can find.
One question... did you change the size of the waist band? I read one suggestion than instead of increasing the length of the tie like Heather says, to just make the waste band bigger. Makes sense to me.
Although this blog does not seem to be active, I just thought I would mention this in case anyone else is looking for information on this wrap skirt.
The only thing I can think of that would make this skirt a bear would be hand stitching that 1/8th inch hem. Do yourself a favor and either use a rolled him foot, make sure your 1/8th inch stitching is accurate, and carefully press it, and then turn it again, sewing it carefully using a thread that matches the skirt.
You could also save some time by not having the ties taper off, and just make them straight.
THanks for the helpful notes! Especially with the photos! I thought this would be so easy, then realized I didn't hardly have enough fabric! I had to piece together an additional overlap piece so I could even wear it! You've saved me additional frustration with the sewing pattern notes! thanks and thanks again!
Post a Comment